
Just when you thought it was safe to go back to town after taking out Zorba, the bastard uses his last breath to resurrect the Human corpse in the square, and, just… Look, I’m sure there’s a perfectly rational explanation for why the Humans are the way they are in Metaphor: ReFantazio, but this guy looks like Old MacDonald had The Substance, E-I-E-I-O, and on The Substance he had some chickens. This is just terrifying, and the only way to get this abomination unto the Lord and off your screen is to kill it. We’ll show you how to poach this egg in a hurry.
Homo Avades Abilities
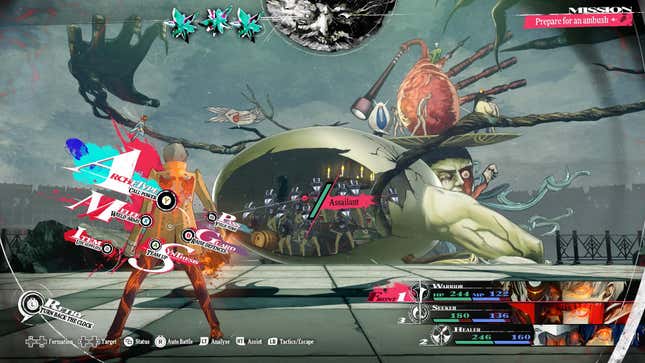
Right off the bat, the heart bagpipes on top of Homo Avades’ head plate (and i wish upon Christ that was a description I just made up) will use either Hamaon to hit one person with Light magic, Mahama to hit the whole party with Light magic, or Oblivion Dust, which inflicts Forget. This bit isn’t too terrible to deal with, but the second its shell cracks open, the situation changes…fast.
Once Homo Avades recovers from the first truly major damage you inflict on him, it’ll grow some creepy tree branch arms, and a mob of soldiers will spawn inside the cracked-open shell. Get more out of life; tell your kids this is where babies come from and ruin their childhood. Anyway, once it’s the mob’s turn, they’ll swarm your team, before the tree hands seal the egg back up and keep it warm by regenerating a big chunk o’ health. The arms will get a little more involved after this point as well, using Swiping Arc to inflict Slash damage to your team. When the heartpipes get low on health, the head will use Sour Scream, which gives him four extra turns. Yikes.
Archetype Recommendations
Pointman on this one is gonna be Brawler. At this stage, it’s the only class that can deliver the Strike damage naturally that you want to deliver on the egg portion of this fight. Yes, the Healer can too if it’s got a strong enough melee weapon, but the Healer being weak to Strikes as well is a real problem you don’t want to be dealing with at the wrong moment. That said, for gits and shiggles, it’s not the worst idea to put some Fire magic on the Brawler using Inheritance or an Igniter so they can do some damage to the arms when the time comes, too.
Second, bring a Warrior. Nobody’s particularly weak to Slash here, but all of its special attacks do excellent damage in a short period, which you’ll want for the heart phase of this.
Lastly, you’ll want a Seeker for one thing only: The Horse-Drawn Carnage Synthesis, which absolutely demolishes the egg every time.
Defeating Homo Avades
So this thing, thankfully, isn’t as terrifying as he looks. There are just quite a few moving parts, and you’ll need to know how to prioritize.
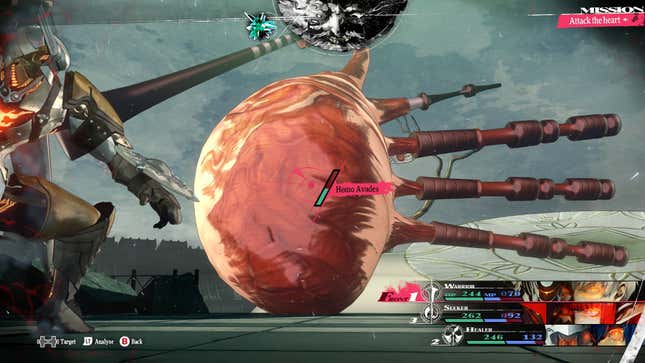
First things first, though: on your initial turn, you’ll have your way with this thing. Ignore the heart for right now. Target the shell portion, have the Brawler throw a Perfect Punch, and your Knight throw Horse-Drawn Carnage. Those two alone are usually enough to crack the egg and reveal the tasteful dining room set inside, and I don’t think I’ve said “where do they come up with this shit” nearly as often with any RPG as I have with these Metaphor Humans.
Anyway, once the egg’s cracked, Homo Avades will collapse just enough to allow you to do proper damage to the heart on its head. The heart doesn’t have any exploitable weaknesses, so the Brawler and Seeker can hit it with whatever. For your Warrior, though, Slicer will do a really nice chunk of damage that the others won’t.
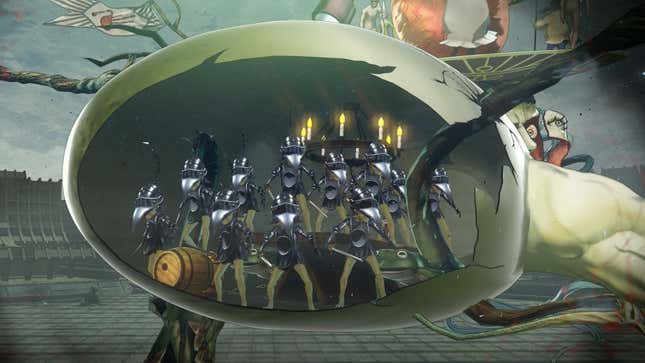
When Eggman’s back on his feet, the real game begins. A veritable Helm’s Deep of soldiers called Assailants will spawn in the dining room set, alone with two creepy tree branch arms. Your first instinct will be to try to take these guys out, and by all means try with Perfect Punch and Horse-Drawn Carnage again. If you can get enough damage in, you might be able to wipe out the army before they swarm you. Chances are decent that you won’t though. It is what it is, you can take that hit at full health. After the hit, the arms will regenerate the shell, and you’re back to square one.
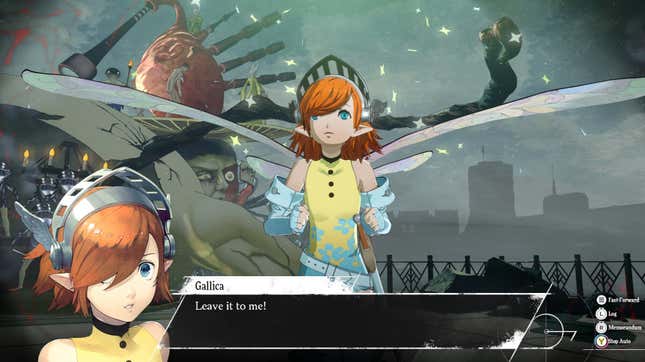
Second verse, same as the first. Crack the shell open with Strike damage, bring the heart down until Homo Avades gets back up, and the army gets summoned. This time, though, Gallica will chime in, offering to throw down with the army on your behalf. Let her do it, and she’ll take a giant chunk of health off of those guys. If you’re wondering, quite logically, why she doesn’t do this more often, that she’s utterly gassed afterward and will be out of commission for the next turn answers that question then and there.
Once you have control again, finish off the Assailants, but then you’ll want to focus your attention on the arms. They’ll be attacking the team on their own, using Slash attacks, while the heart still tosses out occasional magic spells. Target only one arm at a time, primarily using Fire damage from whoever has it to exploit their weakness, and get as much juice out of your turn as you can. At this point, the constant team attacks from both arms and heart can get a little overwhelming if you just sit here in this state too long, so you’ll want to balance attacking an arm with damaging the shell. Once the shell breaks, prioritize healing your team up before attacking the heart. Once Homo Avades rises up again, repeat the process—Gallica can only go after the Assailants every other turn, so be prepared to potentially take a hit from those guys when she’s recovering.
The arms aren’t terribly difficult to bring down, however, and once you’ve taken out one, you’ll notice that the remaining arm still heals the shell, but only for half of its HP. Things get much, much easier from here. Focus on the other arm while doing shell damage. You won’t be taking nearly as much damage with the second arm out of the equation, so unload as much as possible on the heart when it’s down. Repeat the process until the second arm is dead. From here, the shell regenerates on its own, but only for 50HP. Now you can crack that thing open by breathing on it too hard. You can truly focus on simply damaging the heart, while mitigating the Assailants’ attack. Keep it up, and Humpty Dumpty will have himself a great fall.
.


